

To change a junior hacksaw blade, release the tension, fit the new blade, and tighten it until straight.
Learning how to change a junior hacksaw blade is simple once you understand the frame, blade pins, and tension system. This guide explains the process clearly, including blade direction, safety checks, common mistakes, and tips that help the new blade cut cleanly.

What Is a Junior Hacksaw?
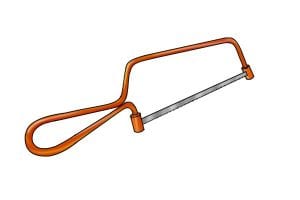
A junior hacksaw is a small hand saw with a narrow metal frame and a short replaceable blade. It is useful for cutting thin metal, plastic pipe, wood trim, threaded rod, and small bolts.
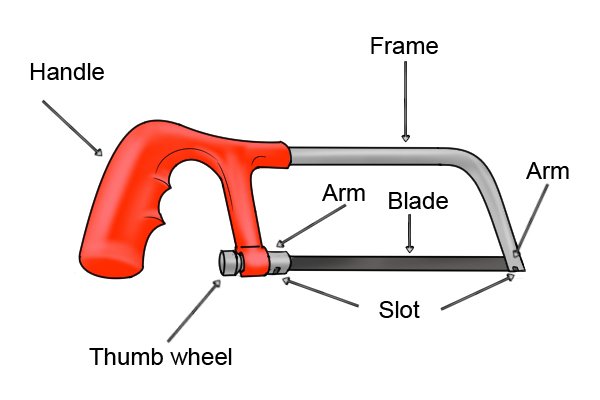
Most junior hacksaws use blades with small holes at each end. These holes fit over pins or hooks on the saw frame. The frame then holds the blade under tension so it stays straight during a cut.
The exact fitting can vary. Some models use a wing nut, while others have a lever or a spring-loaded tension arm. The basic method for how to change a junior hacksaw blade remains the same.
What You Need Before Changing the Blade
Gather the right items before you start. This makes the job faster and helps prevent cuts from the old blade.
• A replacement junior hacksaw blade
• Safety glasses
• Work gloves, if they do not reduce your grip
• A clean workbench or stable surface
• A small brush or cloth for removing metal dust
Check the new blade before fitting it. Make sure it matches the length of the old blade and has holes in the same position.
Most junior hacksaw blades are about 6 inches long, but sizes can differ. The safest choice is to compare the new blade with the old one or check the saw maker’s instructions.

How to Change a Junior Hacksaw Blade
Follow these steps when learning how to change a junior hacksaw blade. Work slowly, especially if the old blade is broken or bent.
1. Wear eye protection
Put on safety glasses before handling the blade. A damaged blade can have sharp points, and small metal chips may fall from the frame.
Place the hacksaw on a stable bench. Do not hold it against your leg or try to change the blade while standing in a cramped space.
2. Release the blade tension
Find the tension control at the front or rear of the frame. Turn the wing nut counterclockwise, or move the release lever if your saw uses a lever system.
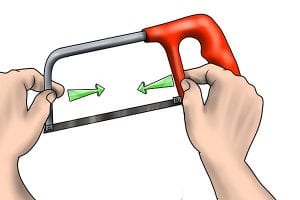
Keep one hand on the blade while releasing the tension. This stops the blade from snapping away from the frame.
Some compact junior hacksaws have a rotating handle that controls tension. Turn it slowly until the blade becomes loose.
3. Remove the old blade
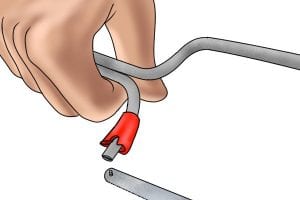
When the tension is fully released, lift one end of the blade away from its pin. Then remove the other end.
If the blade is broken, use pliers to hold it. Do not slide your fingers along the teeth. Even a worn hacksaw blade can cause a painful cut.
This is also a good time to inspect the frame. Look for bent arms, loose pins, cracks, or rust around the blade mounts.
4. Clean the blade mounts
Wipe the pins and mounting slots with a dry cloth. Remove dirt, rust flakes, and metal dust.
A dirty mount can stop the new blade from sitting flat. It may also make the blade twist during use.
Do not apply heavy oil to the blade mounts. Oil can attract dust and may make the blade slip.
5. Check the new blade direction
Look closely at the teeth. On most junior hacksaws, the teeth point away from the handle.
A hacksaw normally cuts on the forward push stroke. If the teeth point toward the handle, the saw may slide without cutting properly.
Some blades have a printed arrow. If the arrow conflicts with a general rule, follow the arrow and the instructions for your saw.
6. Fit one end of the blade
Place one blade hole over the pin at one end of the frame. Keep the teeth facing in the correct direction.
Make sure the blade sits in line with the frame. Do not force the hole onto the pin at an angle.
7. Fit the second end
Pull the blade gently toward the other mounting pin. Fit the second hole over the pin.
You may need to turn the tension knob slightly to create enough space. Never bend the blade sharply to make it fit.
If the blade seems too short or too long, stop and check the size. The wrong blade can damage the frame or fail during a cut.
8. Tighten the blade
Turn the wing nut clockwise or engage the tension lever. Tighten the blade until it is firm and straight.
A correctly fitted blade should not sag. It should also not feel excessively tight like a guitar string.
As a practical check, lightly pluck the blade. A firm, dull sound is normal. Do not rely on sound alone, since blade tension varies between saw designs.
9. Check the alignment
View the hacksaw from the front and side. The blade should run in a straight line through the center of the frame.
If it leans, release the tension and refit one end. A misaligned blade can bind, wander, or break.
10. Test the saw safely
Make a few light strokes on scrap material. Use gentle pressure and watch how the blade tracks.
If the blade slips, stop and increase the tension slightly. If the frame bends or the blade feels overly tight, release the tension and inspect the fit.
How Tight Should a Junior Hacksaw Blade Be?
A junior hacksaw blade should be tight enough to remain straight during a cut. It should not bow when you use light hand pressure.
Overtightening is one of the most common mistakes when changing a junior hacksaw blade. Too much tension can bend the frame, damage the mounting pins, or cause a brittle blade to snap.
Use a small adjustment at a time. Tighten the blade until it holds firm, then stop. The correct tension is firm and stable, not extreme.
Blade tension can also change as the frame warms or the blade wears. Check it before important work, especially when cutting steel or stainless steel.

How to Choose the Right Replacement Blade
The right replacement blade depends on the material and the type of cut. Blade pitch refers to the number of teeth per inch, often written as TPI.
Use these general guidelines:
• Fine blades with 24 to 32 TPI suit thin sheet metal, small tubing, and delicate cuts.
• Medium blades with about 18 to 24 TPI work well for general metal cutting.
• Coarse blades with about 14 to 18 TPI suit thicker plastic, wood, and soft materials.
Choose a blade that keeps at least three teeth in contact with the material during the cut. If too few teeth touch the work, the blade may catch and vibrate.
Bi-metal blades usually last longer than basic carbon steel blades. They cost more, but they can be a good choice for frequent metal cutting.
Safety Tips for Changing a Junior Hacksaw Blade
A junior hacksaw is a small tool, but its blade can still cause serious cuts. Treat the blade as sharp before, during, and after replacement.
• Wear safety glasses when removing or fitting a blade.
• Keep your fingers away from the teeth.
• Release tension before removing the old blade.
• Do not use a bent, cracked, or heavily rusted frame.
• Keep the workpiece clamped so it cannot move.
• Cut away from your body when possible.
• Dispose of broken blades in a rigid container.
• Do not use a blade with missing teeth if it causes rough or uneven cutting.
Safety guidance for hand tools consistently stresses eye protection, secure workpieces, and proper tool condition. These simple steps reduce the risk of flying fragments and sudden tool movement.

Common Mistakes to Avoid
Knowing how to change a junior hacksaw blade also means knowing what not to do. Small errors can shorten blade life or make the saw unsafe.
Installing the blade backward
A backward blade may fail to cut on the push stroke. Check the tooth direction before tightening the frame.
Using the wrong blade length
A blade that is too short may not reach both mounting pins. A blade that is too long may not tighten correctly.
Over-tightening the frame
Excess tension can damage the saw and increase the chance of blade failure. Tighten only until the blade is straight and secure.
Forcing the saw through the material
Let the teeth do the work. Heavy pressure creates heat, bends the blade, and can make it bind.
Ignoring a bent frame
A new blade will not track correctly in a damaged frame. Replace the tool if the frame is badly bent or cracked.
Cutting with a loose workpiece
Movement can pinch the blade. Clamp the material close to the cut and support long pieces.

How to Get a Clean Cut After Changing the Blade
After learning how to change a junior hacksaw blade, your cutting method still matters. Mark the cut line with a pencil, marker, or scribe before you begin.
Start with short, gentle strokes. Once a groove forms, use longer strokes that engage most of the blade length.
Keep the blade square to the material unless you need a special angle. A tilted blade puts side pressure on the teeth and may cause early breakage.
Use steady pressure on the forward stroke and reduce pressure on the return stroke. This rhythm is smoother, safer, and easier on the blade.
When cutting metal, a small amount of suitable cutting fluid can reduce heat and friction. Keep oil away from your hands and use it only when appropriate for the material.
My Practical Lessons From Using Junior Hacksaws
One mistake I often see is rushing the tension step. People fit the new blade, tighten it as hard as possible, and then wonder why the frame bends or the blade breaks during the first cut.
A better approach is to tighten the blade in small turns. I also check the blade from the side before testing it because a slight twist is much easier to correct before cutting.
Another useful lesson is to save the old blade until the new one is fitted. It gives you a quick size and direction reference. Once the new blade works correctly, wrap the old blade before placing it in the trash.
Small blades are not always weak, but they do not tolerate rough handling. A calm setup and light cutting pressure usually produce a better result than force.
Troubleshooting After Blade Replacement
If the saw does not work correctly after changing the blade, check these common problems.
The blade keeps coming loose
The blade may not be fully seated on both pins. Release the tension, refit the blade, and tighten it gradually.
The blade bends during cutting
The blade may be too loose, too fine for the material, or exposed to too much side pressure. Increase tension slightly and keep the saw square.
The blade breaks quickly
Check for excessive tension, a damaged frame, or forceful cutting. A blade with the wrong TPI can also break when it catches in the material.
The saw cuts slowly
The blade may be worn, installed backward, or unsuitable for the material. Replace it with a fresh blade designed for that type of work.
The cut wanders
Start with lighter strokes and keep the blade aligned with the marked line. A dull blade often wanders because the user applies extra force.
How to Maintain a Junior Hacksaw
Good maintenance makes blade changes easier and extends the life of the tool. Wipe the frame after use and remove metal dust from the tension parts.
Store the hacksaw in a dry place. Moisture can cause rust on the frame, pins, and replacement blades.
Inspect the tension knob before each job. If it turns roughly, clean the threads and check for damage.
Keep spare blades in their packaging or in a small case. Loose blades can rub together, lose their protective coating, or create a storage hazard.
Frequently Asked Questions About How to Change a Junior Hacksaw Blade
Which way should the teeth face on a junior hacksaw blade?
The teeth usually face away from the handle because most hacksaws cut on the forward push stroke. Check for an arrow on the blade or instructions from the tool maker if you are unsure.
How tight should a junior hacksaw blade be?
Tighten the blade until it is straight, firm, and secure in the frame. Do not overtighten it, because excessive tension can damage the frame or cause the blade to snap.
Can I use any hacksaw blade in a junior hacksaw?
No. The blade must match the frame length and have suitable mounting holes. Check the old blade or the tool instructions before buying a replacement.
Why does my new junior hacksaw blade keep breaking?
Common causes include too much tension, forceful cutting, a bent frame, or side pressure on the blade. A blade with the wrong tooth pitch may also catch in the material and break.
Can I change a junior hacksaw blade without tools?
Many junior hacksaws allow a blade change by hand with a wing nut or lever. If the fitting is stiff, use care and the correct tool rather than forcing the frame or gripping the teeth.
How often should I replace a junior hacksaw blade?
Replace the blade when it becomes dull, loses teeth, bends, or needs heavy pressure to cut. The replacement interval depends on the material, cutting force, blade quality, and frequency of use.
Conclusion
Changing a junior hacksaw blade takes only a few minutes. Release the tension, remove the old blade, check the tooth direction, fit the new blade over both pins, and tighten it until straight and secure.
Choose the correct blade pitch for the material, avoid excessive pressure, and inspect the frame before every job. With these habits, you can change a junior hacksaw blade safely and make cleaner cuts with less effort.
Try the process on a scrap piece first, then use the saw for your main project. Share your own tips or explore more hand tool guides to build confidence with everyday repairs.
