

You carve stone with hand tools by marking the stone, roughing out shape, then refining it slowly and patiently.
Learning how to carve stone with hand tools is part craft, part discipline, and part trust in the material. I’ve found that stone rewards patience and punishes rushing, which is exactly why hand tools still matter so much. If you want clean cuts, real control, and a deeper feel for the work, this guide will walk you through the full process with practical steps, tool advice, and hard-earned tips.
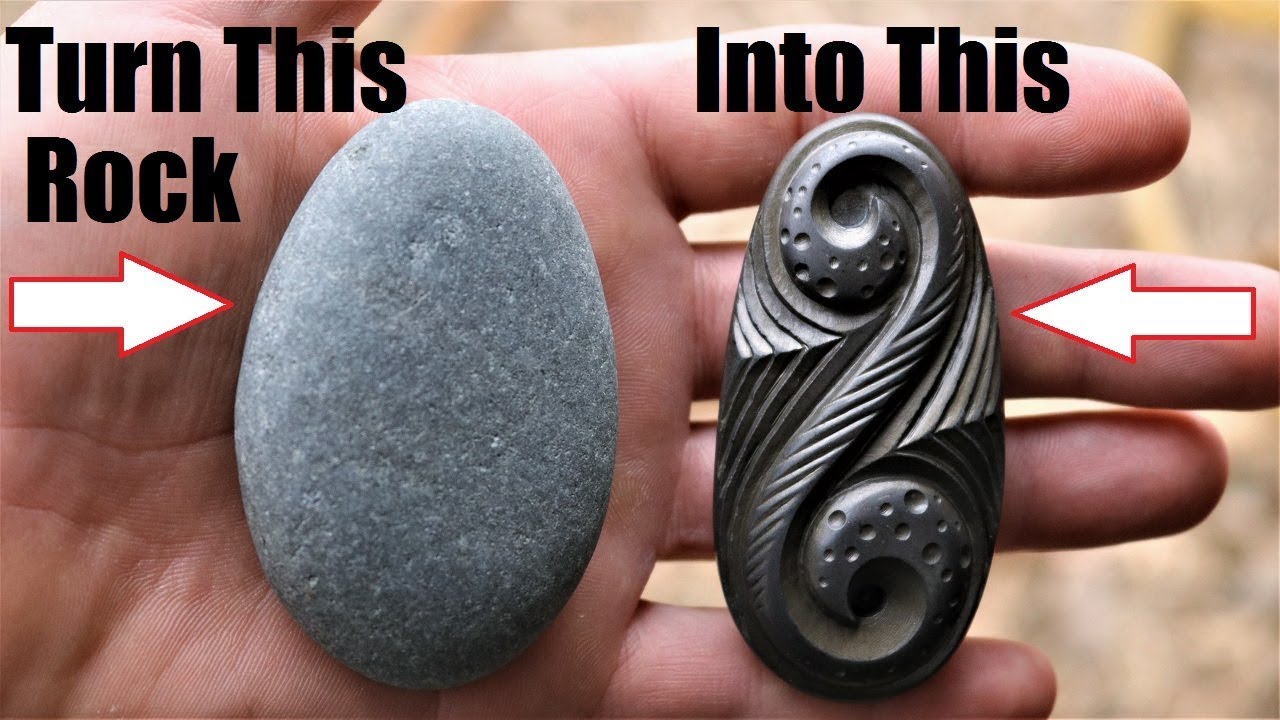
What stone carving with hand tools really means
Stone carving with hand tools is the process of shaping rock using manual tools instead of power equipment. That usually means chisels, mallets, hammers, rasps, points, and abrasives. The goal is not speed. The goal is control.
In my experience, hand carving gives you a better connection to the stone. You hear the change in sound when a cut is right. You feel the grain, faults, and hidden cracks before they ruin the piece. That feedback is one reason many sculptors, masons, and stoneworkers still prefer hand tools for detail work.
Common stones used for hand carving include:
- Limestone, which is soft enough for beginners
- Soapstone, which cuts easily and feels forgiving
- Sandstone, which can work well but may break along layers
- Marble, which carves beautifully but needs care
- Alabaster, which is soft and ideal for fine detail
Hard stones like granite can be carved by hand too, but they require more time, stronger tools, and a lot more endurance. If you are new, start with a soft stone and learn how the material behaves before moving to harder types.
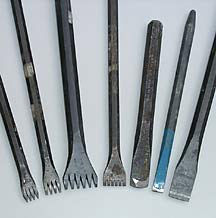
Tools you need to carve stone by hand
Good tools make stone carving safer and cleaner. You do not need a huge workshop to begin, but you do need the right basics.
Essential hand tools
- Point chisel for roughing out shape and breaking large sections
- Tooth chisel for controlled material removal and smoothing rough areas
- Flat chisel for refining planes and edges
- Mallet or hand hammer for striking chisels
- Rasps and rifflers for shaping curves and details
- Surform or stone file for finishing softer stone
- Measuring tools like calipers, ruler, compass, and pencil
- Chalk or soapstone marker for layout lines
Safety gear
Stone dust is not something to ignore. Long-term exposure can be dangerous, especially with silica-bearing stone. OSHA and other safety groups warn that silica dust can cause serious lung damage, so dust control matters even in small projects.
Use:
- Safety glasses or a face shield
- Dust mask or respirator rated for fine dust
- Ear protection if you use any power tools nearby
- Gloves only when appropriate, since they can reduce feel
- Apron, sturdy shoes, and close-fitting clothes
A small bench vise, sandbags, or a stable carving stand can also help. If the stone moves while you carve, your accuracy drops fast.
How to carve stone with hand tools step by step
This is the part most beginners want first: the real workflow. I learned early that stone carving goes better when you treat it like a sequence, not a race. Each stage sets up the next one.
1. Choose the right stone
Start with a stone that matches your skill level. Soft, fine-grained stone is easier to shape and less likely to chip in unexpected ways. Avoid very hard or highly fractured stone until you can read the material better.
Look for:
- Even texture
- Few visible cracks
- No soft pockets or crumbling spots
- A size and shape that fit your project
I once started a small relief on a stone that looked perfect on the outside but had hidden fractures inside. Halfway through, it split along a weak line. That mistake taught me to inspect every block from all sides before I ever touched a chisel.
2. Sketch the design on the stone
Before cutting, draw your design on the surface. Use pencil, chalk, or a light marker, depending on the stone color. If the piece is complex, mark the front, sides, and top so you can keep proportions consistent.
Helpful tips:
- Mark center lines first
- Define the deepest and highest points
- Keep your major shapes simple at the start
- Recheck measurements often
Think of this stage like mapping a road before driving. Better marks now mean fewer regrets later.
3. Secure the stone
Stone should sit solidly before you strike it. Put it on a strong bench, sandbag, or padded support. Make sure it does not wobble, roll, or rest in a way that creates stress cracks.
A stable setup helps you:
- Hit more accurately
- Reduce tool slips
- Protect the stone from accidental breaks
- Save energy during long sessions
Never hold a stone in your hand while striking it unless it is tiny and fully controlled. That is a good way to hurt yourself.
4. Rough out the shape
Use a point chisel and mallet to remove large amounts of stone. Do not chase details yet. Just focus on the general form and the major planes.
Work slowly and in small strikes:
- Aim at the waste material, not the finished shape
- Strike at a slight angle to lift chips
- Leave extra stone for later refinement
- Rotate the piece often so you keep balance
This stage is where many beginners get impatient. They want the final shape too soon. But roughing out is like carving a mountain before carving a face. Get the big forms first.
5. Refine the surfaces
Once the rough shape is close, switch to a tooth chisel or flat chisel. This is where the surface begins to look intentional. Use lighter blows and shorter cuts.
At this stage, pay attention to:
- Flat planes
- Smooth transitions
- Symmetry
- Edge crispness
- Depth changes
On softer stone, a rasp or file may help remove tool marks. For harder stone, patience is more important than force. If you push too hard, the tool may skid or chip the surface in the wrong place.
6. Add detail
Detail work is the slowest part of how to carve stone with hand tools. It also gives the piece its character. Fine lines, folds, textures, lettering, and facial features all come from careful, controlled cuts.
Use smaller chisels and rasps for this stage. If you are making relief carving, work from the background toward the foreground. If you are carving a sculpture in the round, check the form from every angle before finishing any one side.
7. Smooth and finish the surface
The final finish depends on the stone and the look you want. Some pieces look best with visible tool marks. Others need a polished or satin surface.
Finishing options include:
- Fine rasps for soft stone
- Abrasive stones or sandpaper made for stone
- Wet sanding on appropriate materials
- Burnishing for some softer stones
- Leaving tool texture for a hand-made look
Do not overfinish a stone that already has a strong natural character. Sometimes the best surface is the one that still shows the maker’s hand.

Best carving techniques for hand tools
There is more than one way to carve stone with hand tools. The right technique depends on the stone type, the design, and your goal.
Direct carving
Direct carving means you work straight into the stone without making a full model first. It feels intuitive and expressive. It also demands confidence, because mistakes are harder to fix.
This method works well for:
- Abstract sculpture
- Organic forms
- Exploratory work
- Smaller projects
Pointing and measuring
This is a more precise method. You measure a model or drawing and transfer key points to the stone. It is useful when you need accuracy, symmetry, or repeatability.
Stone carvers often use:
- Calipers
- Pointing tools
- Depth gauges
- Reference lines
This method is common in architectural carving and figurative work.
Relief carving
Relief carving stays attached to a background plane. The image seems to rise from the stone. It is often more beginner-friendly than full sculpture because you only carve one direction deeply.
Useful tips for relief work:
- Set a clear background depth
- Define major shapes first
- Keep the background clean and even
- Use shallow details for better readability
Subtractive shaping
All stone carving is subtractive, but this term matters because it reminds you that every cut is permanent. I always tell beginners to think of each strike as a decision. If you remove too much, you cannot add it back.
That mindset makes you slower at first, but it also makes you better.
How to read stone before you carve
One skill separates casual carving from solid hand work: reading the stone. Stone has grain, layering, hardness changes, and hidden flaws. You have to learn how it wants to break.
Watch for:
- Bedding planes in sedimentary stone
- Veins or seams that can split
- Soft spots that crumble
- Tiny cracks that spread under impact
- Changes in sound when you tap the stone
Tap the stone lightly with a hammer or another hard tool. A clean, sharp ring often suggests solid material. A dull sound may point to hidden fractures or weaker zones. It is not perfect, but it helps.
This is one reason experienced carvers seem calm around stone. They are not just carving what they see. They are carving what they understand.
Common mistakes to avoid
Most beginner problems come from rushing or using too much force. I made most of these mistakes myself, so I can tell you they are common and fixable.
Avoid these errors:
- Starting with a stone that is too hard
- Skipping layout marks
- Using one heavy blow instead of controlled strikes
- Carving details too early
- Ignoring cracks and grain direction
- Letting the stone shift while working
- Over-smoothing and losing the shape
Another common issue is tool dullness. Dull chisels force you to hit harder, which creates more vibration and less control. Keep tools sharp and clean.
How to stay safe while carving stone
Safety matters as much as technique. Stone carving looks calm, but it can be hard on hands, eyes, lungs, and joints.
Good safety habits include:
- Wearing eye protection every session
- Using a respirator for dust
- Keeping the workspace clean
- Standing with stable footing
- Taking breaks to reduce fatigue
- Keeping tools stored safely
Silica dust deserves special attention. Fine dust can stay airborne longer than you think, especially indoors. Wet methods, local ventilation, and proper respiratory protection help lower risk. If you are carving regularly, treat dust control as part of the craft, not an afterthought.
Choosing the right stone for your skill level
Not every stone is a beginner stone. The best material depends on your experience and the kind of result you want.
A simple guide:
- Soapstone: easiest for first projects and fine practice
- Limestone: good for learning shape and control
- Alabaster: soft, attractive, and great for detail
- Sandstone: useful but can chip if layered
- Marble: excellent for serious practice, but less forgiving
- Granite: advanced level, slow to carve by hand
If your goal is to learn how to carve stone with hand tools, start soft and move up. That path teaches technique faster than trying to force a hard stone to behave.
Finishing, sealing, and display
After carving, you may want to finish or protect the piece. Some stones benefit from sealing, while others are better left natural. The right choice depends on porosity, indoor or outdoor use, and the final look you want.
Consider:
- Natural finish for a raw, handmade feel
- Light polish for decorative indoor pieces
- Stone sealer for porous stone exposed to moisture
- Proper base or stand for stability
If the piece will go outdoors, durability matters more. Weather, freeze-thaw cycles, and moisture can affect softer stones over time. Always match the finish to the use case.
Benefits and limits of hand carving stone
Hand tools are slower, but they bring real advantages.
Benefits:
- Better control
- Lower equipment cost
- Stronger connection to the material
- More freedom for detail work
- Quiet, focused workflow
Limits:
- Slower production
- More physical effort
- Less suitable for very large projects
- Hard stone can be exhausting by hand
For many artists, the slow pace is actually a feature. It gives you time to think. It also helps you avoid the kind of mistakes that happen when power tools move faster than your judgment.
Frequently Asked Questions
What is the easiest stone to carve by hand?
Soapstone is usually the easiest stone for beginners because it is soft and cuts cleanly. Limestone and alabaster are also good choices if you want a little more structure without too much resistance.
Can you carve granite with hand tools?
Yes, but it is very difficult and slow. Granite is much harder than limestone, soapstone, or alabaster, so it demands strong tools, patience, and a lot of time.
Do you need power tools to start stone carving?
No, you can start with simple hand tools and a small, soft stone. Many beginners learn better with hand tools first because they build a stronger feel for shape, pressure, and grain.
How do you keep stone from cracking while carving?
Use light, controlled strikes and avoid hitting near visible cracks or weak seams. It also helps to choose sound stone, support it well, and carve with the grain or natural layers in mind.
Is stone carving with hand tools safe?
Yes, if you use the right protective gear and control dust. The biggest risks are eye injury, dust exposure, and tool slips, so safety glasses, a respirator, and a stable work area are essential.
How long does it take to carve stone by hand?
It depends on the stone, size, and detail level. A small soft-stone project may take a few hours, while a detailed sculpture can take days or weeks.
Conclusion
Learning how to carve stone with hand tools is really about learning patience, control, and respect for the material. Once you understand the stone, use the right tools, and work in clear stages, the process becomes less intimidating and much more rewarding. Start small, stay safe, and let each cut teach you something.
If you are ready to try it, choose a soft stone, sketch your design, and begin with simple shapes. Keep practicing, keep observing, and you will get better with every piece. If you found this guide helpful, explore more carving resources, share your experience, or leave a comment with your own questions.
