

You carve a bowl with hand tools by hollowing green wood with a spoon knife, gouge, and adze, then refining the shape.
Carving a bowl by hand is one of those craft skills that feels both ancient and deeply practical. I’ve always liked how it slows you down in a good way. If you want to learn how to carve a bowl with hand tools, this guide walks you through the whole process with clear steps, tool choices, safety tips, and the small lessons that make the work easier and safer.

Why carve a bowl with hand tools
Learning how to carve a bowl with hand tools gives you full control over the shape, grain, and finish. It also lets you work quietly, without a machine, which many woodworkers find more satisfying.
Hand carving is especially good for green wood, which is freshly cut wood with more moisture. Green wood cuts easier and is often the best choice for bowls. In my experience, it also forgives beginner mistakes better than dry hardwood.
You also do not need a big shop to start. A simple bench, a vise, and a few sharp tools can get you very far.
Tools and materials you need
Before you start carving a bowl with hand tools, gather the right gear. Sharp tools matter more than expensive tools, and a dull blade makes the job harder and less safe.
Here is a simple starter kit:
- Bowl blank: Green wood is best, such as basswood, birch, maple, ash, or cherry
- Axe or hatchet: Useful for rough shaping
- Adze: Helps scoop out the inside fast
- Spoon knife or hook knife: Good for hollowing the bowl
- Gouges: Handy for refining the interior
- Straight knife: Useful for shaping the rim and exterior
- Clamps or carving vise: Keeps the work steady
- Marking tools: Pencil, compass, or knife for layout
- Sharpening stones or strops: Essential for edge care
- Safety gear: Cut-resistant gloves if you prefer extra protection, plus eye protection when roughing out
If you are just starting, do not try to buy everything at once. A knife, a hook knife, and one gouge can teach you a lot.

Choosing the right wood
Wood choice matters a lot when learning how to carve a bowl with hand tools. Softer woods are easier for beginners, while denser hardwoods can hold detail better but take more effort.
Good beginner woods include:
- Basswood: Easy to carve and very forgiving
- Birch: Fine-grained and stable
- Cherry: Beautiful color and pleasant workability
- Maple: Strong and smooth, but a bit harder
- Alder: Light, workable, and good for practice
Try to avoid very dry, brittle wood for your first bowl. Freshly cut or partially dried wood is usually easier to shape. Also, look at the grain direction before you begin, since grain can help or fight you.
A bowl blank should be thick enough for the shape you want. I usually leave extra material until the final shaping stage, because it is easier to remove wood than to put it back.
How to carve a bowl with hand tools: step by step
The process is simple in concept, but each step matters. If you rush one stage, the later work becomes harder.
1. Draw the bowl shape
Start by marking the top view and side profile. This helps you stay balanced and avoid making the bowl lopsided.
Mark these points:
- Rim diameter
- Center line
- Depth of the bowl
- Foot or base area
A clear layout keeps you from guessing while you carve. That alone saves a lot of frustration.
2. Rough out the blank
Use an axe, hatchet, or saw to remove extra wood. Shape the outside first if the blank is oversized.
If you are working from a log or block, trim it into a round or oval form. This makes the carving more comfortable and reduces waste. I learned early that a rough block with sharp corners fights back more than a clean blank.
3. Shape the outside
Before hollowing the inside, refine the outside curve. This gives the bowl its final feel and helps you understand the thickness you need to preserve.
Work slowly and keep checking symmetry. A bowl does not have to be perfectly even, but it should look intentional.
4. Hollow the interior
Now comes the part most people think of when they imagine how to carve a bowl with hand tools. Use a spoon knife, hook knife, or gouge to remove the inside wood in layers.
Tips for hollowing:
- Work from the center outward
- Take small cuts
- Follow the grain when you can
- Stop often to check wall thickness
- Leave extra thickness for sanding or fine shaping
Green wood usually peels away in clean curls if the tool is sharp. If the wood tears, check the grain direction or sharpen the blade.
5. Refine the interior curve
Once the cavity is deep enough, smooth the inside with lighter cuts. This is where control matters more than speed.
Use a smaller gouge or hook knife to even out ridges. Think of it like shaping a spoon inside a shell. You are aiming for a smooth curve, not a flat floor.
6. Shape the rim and exterior
With the bowl hollowed, return to the rim and outside surface. Clean up the edge and soften any harsh corners.
You can leave the outside rustic or make it more refined. Both can look good, as long as the shape feels balanced in the hand.
7. Check wall thickness
Hold the bowl up to the light or feel it carefully from the outside. Consistent wall thickness makes the bowl look better and helps it dry more evenly.
A common beginner mistake is making one side thin and the other side thick. That can lead to cracks or warping later.
8. Dry and finish the bowl
If you carved green wood, let the bowl dry slowly. Place it in a cool, shaded spot with airflow. Fast drying can cause cracks.
After drying, you can do a light final cleanup and apply a finish. Food-safe options include:
- Mineral oil
- Walnut oil
- Beeswax blends
- Carnauba-based finishes
Avoid heavy film finishes if you want the natural feel of carved wood. A simple oil finish usually looks best and feels right in the hand.
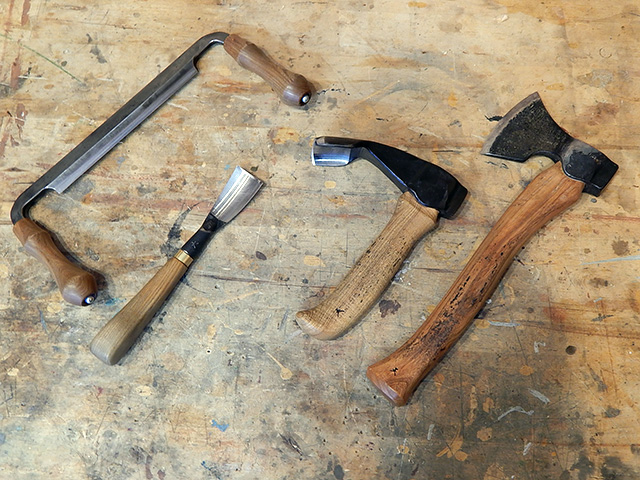
Best hand tools for bowl carving
The tools you choose affect both the process and the result. In my experience, it is better to own a few reliable tools than a drawer full of dull ones.
Spoon knife or hook knife
This is the main tool for hollowing bowls. It is curved so it can reach into the inside of the bowl.
Choose one with a comfortable handle and a steel edge that sharpens well. If the tool feels awkward, your hands will tell you fast.
Gouges
Gouges come in different sweeps and widths. A shallow gouge helps refine broad curves, while a deeper gouge removes more wood.
They are useful when you want more control than a hook knife gives. I reach for a gouge when the bowl starts to need finesse.
Adze
An adze removes wood quickly from the interior. It is excellent for roughing out larger bowls.
It takes practice, so do not force it. The adze should skim and cut, not dig and jump.
Carving knife
A straight knife is useful for trimming the outside profile, smoothing edges, and cleaning details. It is a good all-around tool for bowl work.
Sharpening tools
A sharp tool is part of the process, not an optional extra. Keep strops, honing compound, or sharpening stones nearby.
If the tool stops cutting cleanly, pause and sharpen. You will save time in the long run.
Safety tips for carving a bowl by hand
Hand carving is calm work, but sharp tools still deserve respect. Safe habits make the experience more enjoyable.
Keep these points in mind:
- Cut away from your body whenever possible
- Secure the wood firmly before carving
- Keep both hands behind the cutting edge
- Take small cuts instead of forcing the tool
- Wear eye protection during rough shaping
- Keep fingers out of the line of travel
- Stop if you feel tired or rushed
One thing I have learned is that most carving accidents happen when people get casual. Slow down, reset your grip, and make the next cut clean.
Common mistakes to avoid
If you are learning how to carve a bowl with hand tools, you will probably make a few rough bowls first. That is normal. The goal is to make mistakes that teach you something.
Watch out for these common issues:
- Starting with wood that is too dry and hard
- Making the walls too thin too early
- Ignoring grain direction
- Using dull tools
- Carving too fast and losing symmetry
- Leaving tool marks too deep
- Drying the bowl too quickly
A lot of beginners think the answer is stronger pressure. Usually, the better answer is sharper tools and lighter cuts.
Finishing options and care
The finish should match how you plan to use the bowl. A decorative bowl and a food bowl do not always need the same treatment.
For functional bowls, a simple oil and wax finish is a solid choice. It protects the wood while keeping the natural feel. For display pieces, you may want a slightly richer finish, but keep it compatible with the wood and use case.
To care for a carved wood bowl:
- Wash by hand, not in a dishwasher
- Dry it right away after cleaning
- Reapply oil when the wood looks dry
- Store it away from heat and direct sun
Wood is a living material in the sense that it moves with moisture and temperature. Treat it well, and it will age beautifully.
Benefits and limitations of hand carving
There are real benefits to carving bowls by hand, but it helps to know the limits too.
Benefits:
- Better control over shape
- Quiet, low-cost setup
- Strong connection to the material
- Less risk of overcutting compared with some power methods
- Great for small batches and custom pieces
Limitations:
- Slower than machine work
- Requires sharp tools and maintenance
- Takes practice to master grain control
- Harder work on dense or dry hardwoods
For many woodworkers, the slower pace is actually the point. It turns a useful object into a craft project with character.
Personal tips from real carving sessions
One lesson I learned the hard way is that the outside shape should be nearly finished before deep hollowing starts. If you hollow first and shape later, you risk uneven walls.
Another tip is to stop before you think you need to stop. Fresh eyes catch shape problems faster than tired hands do. I also like to rotate the bowl often while carving, because one angle can hide a flaw that another angle reveals instantly.
If you ever feel stuck, go back to the grain and the silhouette. Those two things solve most bowl carving problems.
Frequently Asked Questions of how to carve a bowl with hand tools
What wood is best for carving a bowl with hand tools?
Green hardwoods like basswood, cherry, maple, birch, and ash work very well. They are easier to cut cleanly and often produce a smoother surface.
Do I need an adze to carve a bowl by hand?
No, but it helps if you want to remove wood faster. A spoon knife or gouge can still handle the job, especially for smaller bowls.
How do I keep my bowl from cracking?
Dry it slowly in a shaded, airy place and avoid making the walls too thin. Leaving even wall thickness also helps reduce stress as the wood shrinks.
Can I make a food-safe bowl with hand tools?
Yes, if you use food-safe wood and a safe finish like mineral oil or beeswax. Avoid finishes that are not intended for food contact.
How long does it take to carve a bowl with hand tools?
A simple bowl can take a few hours, while a more refined one may take much longer. Your pace depends on the wood, the tool sharpness, and how detailed you want the final shape to be.
Conclusion
Carving a bowl by hand is part skill, part patience, and part trust in the wood. Once you learn how to carve a bowl with hand tools, the process becomes less about forcing shape and more about revealing it.
Start simple, keep your tools sharp, and let the grain guide your cuts. If you practice with care, each bowl will teach you something useful for the next one. Try your first bowl, keep notes on what worked, and share your results or questions with other woodcarvers to keep learning.
