

Mortise and tenon joints with hand tools are made by careful layout, clean sawing, and patient chisel work.
If you want a joint that feels old-school in the best way, this is it. I’ve found that learning how to make mortise and tenon joints with hand tools teaches you more than joinery; it teaches control, accuracy, and patience. Done well, this joint can hold furniture together for decades, and the process is simpler than it looks once you understand the sequence.
What a Mortise and Tenon Joint Is
A mortise and tenon joint is one of the oldest and strongest woodworking joints. The tenon is the narrow tongue cut on the end of one board. The mortise is the matching slot cut into the other board.
The two parts fit together like a key in a lock. That tight fit is what gives the joint strength. In furniture making, this joint shows up in table legs, chairs, doors, frames, and workbenches.
When people ask how to make mortise and tenon joints with hand tools, the real answer is this: measure carefully, cut slightly proud, and test-fit often. That approach gives you a joint that looks clean and works hard.
Why This Joint Still Matters
Even in a shop full of machines, hand-cut mortise and tenon joints still matter. They are quiet, accurate, and deeply satisfying to make. They also let you work without expensive tools, which is a big plus for beginners and traditional woodworkers.
Here’s why I still recommend learning how to make mortise and tenon joints with hand tools:
- Strong construction: The joint resists pulling apart and holds up well under load.
- Timeless look: It has a classic, handmade feel.
- Better control: Hand tools let you fine-tune each cut.
- Low equipment needs: A saw, chisels, marking tools, and a mallet can get the job done.
- Skill building: You learn layout, saw control, and chisel technique in one project.
In my experience, this joint exposes mistakes fast. That can feel frustrating at first, but it also makes you better very quickly.

Tools and Materials You Need
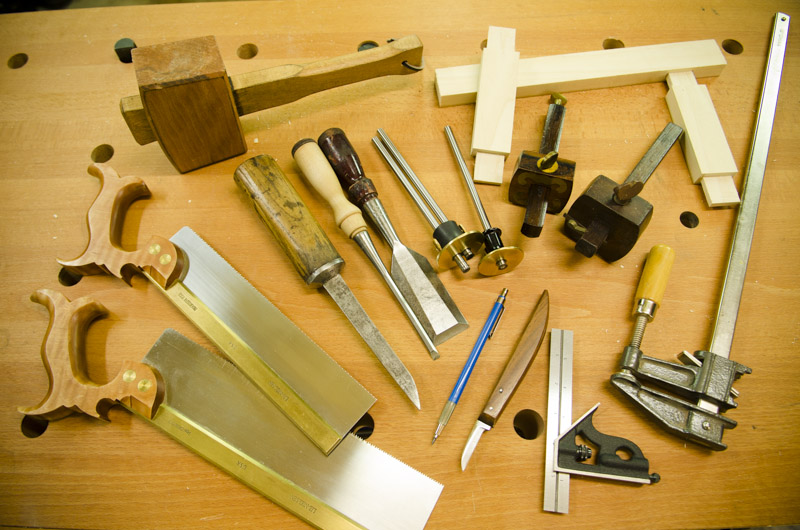
You do not need a huge toolbox to learn how to make mortise and tenon joints with hand tools. A simple setup works well.
Basic tools
- Marking knife or sharp pencil
- Combination square or try square
- Mortise gauge or marking gauge
- Hand saw, such as a tenon saw or backsaw
- Chisels in a few widths
- Wooden mallet
- Bench vise or clamps
- Pencil, ruler, and tape measure
- Sharpening stone or honing guide
Helpful materials
- Straight, dry lumber
- Scrap wood for test cuts
- Optional glue for final assembly
- Optional clamps for glue-up
Sharp tools matter more than fancy tools. A dull chisel can crush fibers instead of cutting them, and a dull saw wanders. The tool quality is less important than the edge and your setup.
Choose the Right Wood
Wood choice affects how easy the joint is to cut and how well it fits. Straight-grained hardwoods and stable softwoods are usually easier to work by hand.
Good choices include:
- Oak
- Maple
- Ash
- Pine
- Poplar
Avoid wood with heavy twist, wild grain, or lots of knots near the joint area. Those defects make it harder to saw straight and chisel cleanly.
If you are just learning how to make mortise and tenon joints with hand tools, start with scrap pine or poplar. It cuts easily and shows your mistakes without being too hard on your tools.
Step-by-Step: How to Make Mortise and Tenon Joints with Hand Tools
The process is simple when broken into parts. The key is to work in order and keep checking your layout.
1. Mark the joint clearly
Start by deciding the joint size. Mark the shoulder line around the tenon piece using a square. Then mark the tenon cheeks and the mortise location.
Use a marking knife if you can. Knife lines give chisels and saws a clean edge to follow. Pencil marks are fine for rough work, but a knife line is better for accurate joinery.
A good rule I learned early: layout first, cut second. Rushing the layout usually means redoing the part later.
2. Lay out the mortise and tenon to match
The mortise and tenon should match closely, but not so tightly that the joint cannot close. A common approach is to make the tenon slightly smaller than the mortise opening at the start, then sneak up on the final fit.
Useful layout tips:
- Keep the mortise centered unless your design calls for an offset.
- Mark the depth of the mortise on both sides of the workpiece.
- Mark waste clearly so you do not cut the wrong side.
- Use the same gauge setting for both parts when possible.
If the joint is decorative or structural, consistency matters even more. A sloppy layout almost always leads to a sloppy fit.
3. Cut the mortise first or tenon first
Many woodworkers prefer to cut the mortise first. That lets you size the tenon to the actual opening. Others cut the tenon first and use it as a guide for the mortise. Either way can work.
For beginners, I often suggest cutting the mortise first:
- It gives you a real opening to fit to.
- You can measure the opening after chopping.
- It reduces guesswork when trimming the tenon.
4. Chop the mortise with chisels
Drill or chop a starter hole if needed, then remove the waste in stages. Keep your chisel inside the layout lines and work down in small bites.
A clean mortise usually comes from this rhythm:
- Chop a little
- Move the chisel
- Chop a little more
- Clean the walls as you go
Do not try to remove all the waste at once. That is how edges chip and mortises get crooked. Work from both ends toward the middle when possible, especially on thicker stock.
One thing I learned the hard way is that forcing a chisel through the last fibers can split the edge past the line. A lighter touch usually saves more time than a big swing.
5. Saw the tenon cheeks
Clamp the tenon piece securely. Cut the shoulders first if your layout allows it, or at least establish them clearly. Then saw down the cheek lines.
Keep the saw just outside the line at first. You can always pare to the line later. It is much harder to fix a tenon that was cut too small.
Helpful saw tips:
- Start the cut with short, controlled strokes.
- Keep your wrist loose but your eye on the line.
- Let the saw do the work.
- Stop before the shoulder if you want to clean it with a chisel.
This is where hand-tool joinery feels a lot like drawing with a blade. Calm, steady strokes give the best result.
6. Shape the shoulders
The shoulders are the flat faces that meet the mortise face. Clean shoulders help the joint close tightly and look sharp.
Use a chisel to pare the shoulders after sawing. Check with a square. If one shoulder is off, the joint may seat crooked even if the tenon fits the mortise.
A small error here can make the whole joint look out of line. That is why I always check shoulder squareness before testing the fit.
7. Test-fit the joint
Dry-fit the joint before applying glue. It should slide together with firm hand pressure or light mallet taps. If it jams, mark the tight areas and trim only those spots.
Good fit signs:
- The shoulders close evenly
- The tenon enters without heavy force
- The joint sits square
- There are no large gaps at the edges
If the fit is too loose, the joint may still work with glue, wedges, or pegs depending on the design. But a loose fit is harder to fix than a slightly tight one.
8. Refine the fit
Fine-tuning is part of the process. Use a sharp chisel, shoulder plane, or rasp to remove tiny amounts of wood. Check often.
When I was learning how to make mortise and tenon joints with hand tools, I used to over-correct. That usually made the joint worse. Now I remove a little, test, and repeat. It takes longer on paper, but it saves the project.
Common Types of Mortise and Tenon Joints
Not all mortise and tenon joints are the same. The type you choose depends on strength, appearance, and the project.
Through mortise and tenon
The tenon passes all the way through the mortise and may be visible on the other side. This is a strong joint and can be decorative.
Stub mortise and tenon
The tenon does not go all the way through the mating piece. It is common in furniture where you want a hidden joint.
Wedged mortise and tenon
The tenon is split or shaped to accept wedges. Wedges spread the tenon and lock it into place.
Haunched mortise and tenon
This version adds a small raised section, or haunch, that helps resist twisting and improves alignment.
Blind mortise and tenon
The mortise does not pass through the wood. This keeps the joint hidden from view.
Each version starts with the same basic idea. The differences are in the proportions and final shaping.

Practical Tips for Better Results
The best joinery often comes from small habits, not big tricks. These tips can make a real difference.
- Keep tools sharp: Sharp tools leave cleaner surfaces and reduce tear-out.
- Work from the reference face: Use the same face and edge for all layout.
- Use scrap first: Test your setup on offcuts before touching the project piece.
- Stay square: Check with a square often during cutting.
- Leave room for cleanup: It is safer to cut slightly proud and pare later.
- Mark waste clearly: Confusion leads to mistakes.
- Control grain direction: Saw and chisel with the grain when possible.
A lot of beginners think precision means never making a mistake. In reality, precision means noticing a mistake early and correcting it before it grows.
Mistakes to Avoid
When learning how to make mortise and tenon joints with hand tools, a few errors show up again and again.
- Cutting the tenon too small: This creates a loose joint that is hard to rescue.
- Chopping past layout lines: That weakens the fit and can ruin the mortise.
- Ignoring shoulder squareness: Even a good tenon will look bad if the shoulders are off.
- Using dull tools: Dull edges crush fibers and make cuts harder to control.
- Skipping test fits: You miss small issues until the final assembly.
- Cutting too fast: Speed often leads to slanted saw cuts and ragged mortises.
If you remember only one thing, remember this: measure twice, but test often. That habit saves projects.
How to Glue and Assemble the Joint
Once the dry fit looks good, you can glue the joint if the project calls for it. Some traditional joints also use pegs or wedges for extra strength.
Basic glue-up steps:
- Make sure all surfaces are clean and dry.
- Apply a thin, even layer of glue.
- Assemble the joint fully before the glue starts to set.
- Clamp if needed, but do not crush the joint.
- Wipe away squeeze-out with a damp cloth.
For a wedged or pegged joint, follow the design before gluing. In some cases, the wedges or pegs are what create the lock, so the glue is only part of the strength.
Real-World Uses
Mortise and tenon joints show up in many projects because they hold up well under stress.
Common uses include:
- Dining tables
- Chairs
- Cabinets
- Frames and doors
- Benches
- Bed frames
- Traditional timber structures
If the joint may face side-to-side movement or weight, this joint is often a smart choice. It has been trusted for centuries because it works.
Why Hand Tools Are Worth the Effort
Learning how to make mortise and tenon joints with hand tools is not just about saving money. It changes the way you see wood.
Hand tools give you feedback. You can feel when the chisel is cutting cleanly. You can hear when the saw is tracking straight. You can see the grain react under the blade.
That kind of feedback is hard to get from machines. It is like learning to cook from scratch instead of just heating food. The process takes more attention, but the skill stays with you.
Frequently Asked Questions of how to make mortise and tenon joints with hand tools
What is the easiest mortise and tenon joint for beginners?
A basic stub mortise and tenon joint is usually the easiest place to start. It uses simple layout and straight cuts, so you can focus on fit and squareness before trying decorative versions.
Do I need a mortise gauge to make this joint by hand?
A mortise gauge helps a lot because it marks both sides of the mortise at once. You can use a marking gauge and square too, but a mortise gauge makes layout faster and more accurate.
How tight should a mortise and tenon fit?
The joint should fit firmly, but it should not need extreme force. A light mallet tap or hand pressure is ideal for dry fit, since the glue will add a little slip and grip during assembly.
Can I make a mortise and tenon joint without a chisel?
You can rough out the mortise with drills or a brace, but a chisel is still the best tool for cleaning the walls. For a proper hand-cut joint, a sharp chisel is one of the most important tools you can have.
Why does my tenon gap at the shoulders?
Shoulder gaps usually come from saw cuts that are not square or from uneven cleanup. Check your saw posture, keep the work clamped firmly, and pare the shoulders slowly with a sharp chisel.
Should I cut the mortise or tenon first?
Many woodworkers prefer to cut the mortise first because it gives you a real opening to fit the tenon to. That said, both methods work well if your layout is accurate and your cuts are clean.
Conclusion
Learning how to make mortise and tenon joints with hand tools is one of the best ways to build real woodworking skill. You get stronger joints, better control, and a deeper understanding of how wood behaves. Most of all, you gain confidence with every clean cut and tight fit.
Start with simple stock, keep your tools sharp, and do not rush the layout. If you practice the process step by step, this joint becomes much easier than it first appears. Try it on a scrap project, then build something useful with it and see how far your hands can take you.
