

You can make a wooden spoon with hand tools by carving, shaping, sanding, and finishing a suitable hardwood blank.
Making a wooden spoon with hand tools is one of those old-school projects that feels simple, but teaches a lot. You learn grain direction, sharp edge control, and patience fast. If you want a spoon that is useful, beautiful, and made the traditional way, this guide will walk you through how to make a wooden spoon with hand tools from start to finish.
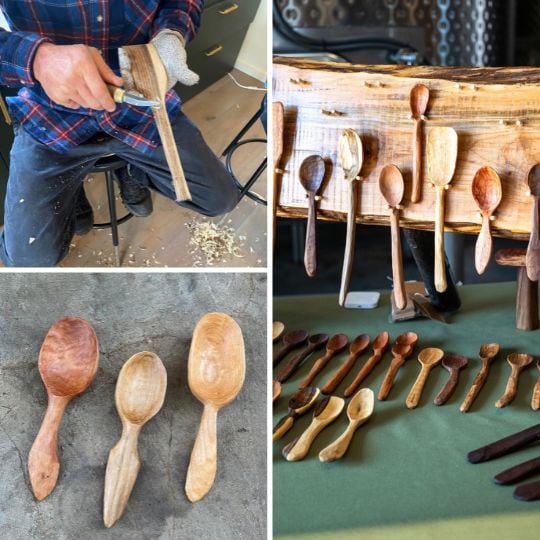
What You Need to Make a Wooden Spoon with Hand Tools
Before you start carving, gather the right wood and a small set of hand tools. The process is much easier when your tools are sharp and your wood is dry, straight-grained, and friendly to carve.
Good wood choices include:
- Maple, which is strong, smooth, and durable
- Cherry, which carves nicely and ages beautifully
- Birch, which is easy to shape and common in spoon carving
- Walnut, which gives a rich color and good working feel
- Beech, which is often used for kitchen tools because it is tough and fine-grained
Avoid wood with knots, cracks, twist, or wild grain. I learned this the hard way on an early spoon blank that split right through the bowl after only a few cuts. A pretty piece of wood is not always a good spoon blank.
Tools you may need:
- Pencil for drawing your spoon shape
- Spoon or hook knife for hollowing the bowl
- Carving knife for shaping the handle and outline
- Coping saw or hand saw for rough cutting the blank
- Hatchet or carving axe for rough shaping, if available
- Sandpaper in several grits
- Clamp or carving vice for safety
- Card scraper or small file for refinement
A small, controlled setup is best. You do not need a full workshop to make a wooden spoon with hand tools. A bench, a clamp, and a stable cutting position can be enough.

How to Choose the Right Wood for a Wooden Spoon
The best spoon wood is straight-grained, dry, and non-toxic for kitchen use. Hardwoods are usually better because they last longer and resist wear from cooking and washing.
When choosing a blank, look for these traits:
- Straight grain, so the spoon is less likely to split
- Fine texture, so the spoon feels smooth in the hand
- Dry stock, so the spoon stays stable over time
- No bark inclusions or cracks, because these weaken the shape
Freshly cut green wood is easier to carve than dry wood, but it can warp as it dries. Dry wood is more stable, though a little harder to carve. Many experienced carvers like green wood for rough shaping and then finish the spoon after it dries.
If you are just learning how to make a wooden spoon with hand tools, start with a forgiving wood like basswood, cherry, or birch. These woods give you feedback without fighting back too much.
Step-by-Step: How to Make a Wooden Spoon with Hand Tools
The spoon-making process is easier if you break it into small, calm steps. Think of it like sculpting a spoon that is already hiding inside the wood.
1. Draw the Spoon Shape
Start by sketching the spoon on your blank. Mark the bowl, neck, and handle with simple lines.
Keep the shape balanced:
- A larger bowl for serving spoons
- A narrower bowl for cooking spoons
- A comfortable handle length that fits your hand
Do not worry about perfection at this stage. The first lines are just a map.
2. Rough Cut the Blank
Use a hand saw or coping saw to cut around the outline. Leave a little extra wood outside the line so you have room to refine the shape later.
If you use a hatchet, split and chop slowly. Keep your cuts controlled and always cut away from your body. The goal is to remove bulk, not to reach the final spoon shape yet.
3. Shape the Profile
Now thin the spoon from the side. This is where the spoon starts to look like a spoon instead of a stick.
Focus on:
- The handle taper
- The neck strength
- The bowl thickness
- Smooth transitions between each part
A spoon that is too thick feels clumsy. One that is too thin may snap or feel weak. I have found that leaving a little extra thickness during carving is smarter than trying to make it perfect too early.
4. Hollow the Bowl
Use a spoon knife or hook knife to carve the bowl. Cut across the grain in small, controlled scoops. Work slowly and rotate the spoon in your hands so you stay comfortable.
Helpful tips:
- Start in the center and work outward
- Keep both thumbs steady for control
- Follow the grain when possible
- Stop before the bowl gets too thin
The bowl should be deep enough to hold food, but not so deep that it becomes hard to clean. This is one of the most important parts of learning how to make a wooden spoon with hand tools, because the bowl shape determines both function and comfort.
5. Refine the Outside of the Bowl
Once the inside is hollowed, shape the outside of the bowl. This often gets ignored, but the outside matters for balance, strength, and beauty.
Try to keep the bowl walls even. A spoon with one thick side and one thin side feels awkward in the hand. The best spoons look simple, but they are very carefully balanced.
6. Shape the Handle
The handle should feel good in the hand and match the spoon’s use. A cooking spoon usually benefits from a longer handle. A small tasting spoon can be shorter and more delicate.
Make the handle:
- Slightly tapered
- Smooth on the edges
- Comfortable to pinch and grip
- Strong at the neck where stress is highest
A common mistake is making the handle too flat too soon. Leave some thickness until the final shaping stage.
7. Sand and Smooth the Spoon
After carving, sand the spoon to remove marks and soften edges. Start with medium grit and move to finer grit.
A simple sanding sequence:
- 120 grit to remove tool marks
- 180 grit to refine the surface
- 220 grit for a smooth finish
- 320 grit if you want a very polished feel
Do not over-sand the bowl if you want to preserve crisp carving lines. Some hand-carved texture adds character and gives the spoon a handmade look.
8. Apply a Food-Safe Finish
Finish the spoon with a food-safe oil or wax. Common choices include:
- Mineral oil
- Walnut oil
- Beeswax blends
- Tung oil labeled food-safe after full curing
Apply a thin coat, let it soak in, and wipe away excess. A spoon does not need a thick finish. In fact, thick coatings can feel sticky or wear unevenly.
I usually tell beginners to keep finishing simple. A spoon should look like wood, not plastic.

Common Mistakes When Making a Wooden Spoon
Even a simple project has traps. The good news is that most problems are easy to avoid once you know what to watch for.
Common mistakes include:
- Cutting across weak grain, which can cause splitting
- Making the bowl too thin too early
- Leaving the handle too bulky
- Using dull tools, which increases slips and rough cuts
- Rushing the sanding and finish stages
Another common issue is ignoring spoon balance. A spoon that looks fine on the bench can feel strange in the hand if the handle is too heavy or the bowl is too small. Always hold the spoon as you go and test the feel.
When I first learned how to make a wooden spoon with hand tools, I focused too much on shape and not enough on comfort. The spoon looked nice, but it felt top-heavy. That mistake taught me to test the grip at every stage.
Safety Tips for Hand Carving
Hand tool work is safe when you stay alert and respect the grain. Most accidents happen when the tool slips or the wood moves unexpectedly.
Keep these safety habits in mind:
- Carve away from your body
- Secure the wood with a clamp or vice
- Keep knives sharp so they cut with less force
- Work in good light
- Take small cuts instead of forcing the blade
- Pause if your hands get tired
Sharp tools are safer than dull ones because they need less pressure. That may sound backwards, but it is true in carving and woodworking.
Best Uses for a Handmade Wooden Spoon
A handmade spoon is more than a craft item. It is practical, durable, and pleasant to use every day.
You can use a wooden spoon for:
- Stirring soups and sauces
- Mixing batter and dough
- Serving rice, vegetables, or stews
- Tasting while cooking
- Gift-giving and home décor
Wooden spoons are gentler on cookware than metal utensils. They also stay cooler in hot pots, which makes them more comfortable for long cooking sessions. If you make one well, it can become a tool you reach for every day.
Why Making a Wooden Spoon With Hand Tools Is Worth It
Learning how to make a wooden spoon with hand tools gives you more than just a kitchen utensil. It teaches patience, control, and a better feel for working with wood.
Benefits include:
- Low-cost entry into woodworking
- Minimal tools required
- A satisfying handmade result
- Better understanding of wood grain
- A useful object you can actually use
There is also something grounding about making a tool by hand. It slows you down in a good way. You start noticing texture, shape, and balance the way a cook notices seasoning.
How to Care for a Wooden Spoon
A wooden spoon lasts a long time if you treat it well. Proper care matters just as much as the carving process.
Care tips:
- Wash by hand with mild soap
- Dry it right away
- Do not soak it in water
- Re-oil it when the surface looks dry
- Store it in a dry place away from heat
If the spoon starts to feel rough, lightly sand it and add a fresh coat of oil. That small bit of maintenance can keep it useful for years.
Frequently Asked Questions of how to make a wooden spoon with hand tools
What is the easiest wood for a beginner spoon carver?
Basswood and birch are two of the easiest woods for beginners. They carve smoothly and are less likely to fight the knife, which helps you build confidence faster.
Do I need a spoon knife to make a wooden spoon with hand tools?
A spoon knife makes the job much easier, especially for hollowing the bowl. You can start with a carving knife alone, but a spoon knife gives you cleaner control and better results.
How thick should a wooden spoon be?
A finished wooden spoon should be strong but not bulky. Most spoons feel best when the bowl and handle are thin enough to feel light in the hand, but thick enough to avoid flexing or cracking.
Can I make a wooden spoon without power tools?
Yes, you can make a wooden spoon with hand tools only. In fact, many traditional spoon makers prefer hand tools because they offer better control and a more personal result.
What finish is safest for a wooden spoon?
Food-safe mineral oil or a food-safe oil and wax blend are common choices. These finishes protect the wood without creating a hard plastic-like coating.
How long does it take to make a wooden spoon with hand tools?
A simple spoon can take one to three hours, depending on your skill and the wood. If you are new, expect your first spoon to take longer, which is normal and part of learning.
Conclusion
Making a wooden spoon with hand tools is a practical skill that blends craft, patience, and everyday usefulness. Once you understand the wood, the grain, and the basic carving steps, the process becomes much less intimidating and a lot more rewarding.
Start with a simple design, keep your tools sharp, and work slowly enough to stay in control. Your first spoon may not be perfect, but it will teach you a great deal, and that knowledge carries into every project after it. If this guide helped you, try making your own spoon, explore more hand-carving projects, or leave a comment with your experience.
