

A hand rivet nut tool installs threaded inserts in thin material without welding, using a simple squeeze-and-set process.
If you need strong, reusable threads in sheet metal, tubing, plastic, or composite panels, learning how to use a hand rivet nut tool is a valuable workshop skill. The process is simple, but correct insert sizing, hole preparation, mandrel setup, and controlled compression make the difference between a secure thread and a spinning, damaged insert.
What Is a Hand Rivet Nut Tool?
A hand rivet nut tool, also called a rivet nut setter or nutsert tool, installs a threaded insert into material that is too thin to tap. The insert has internal threads and a thin body that collapses behind the workpiece when the tool is tightened.
Think of it as creating a captive nut where no nut can fit. Once installed, the rivet nut gives you a threaded hole for a bolt, screw, or machine fastener.
Common materials for rivet nuts include:
- Aluminum
- Mild steel
- Stainless steel
- Plastic
- Fiberglass
- Thin-wall tubing
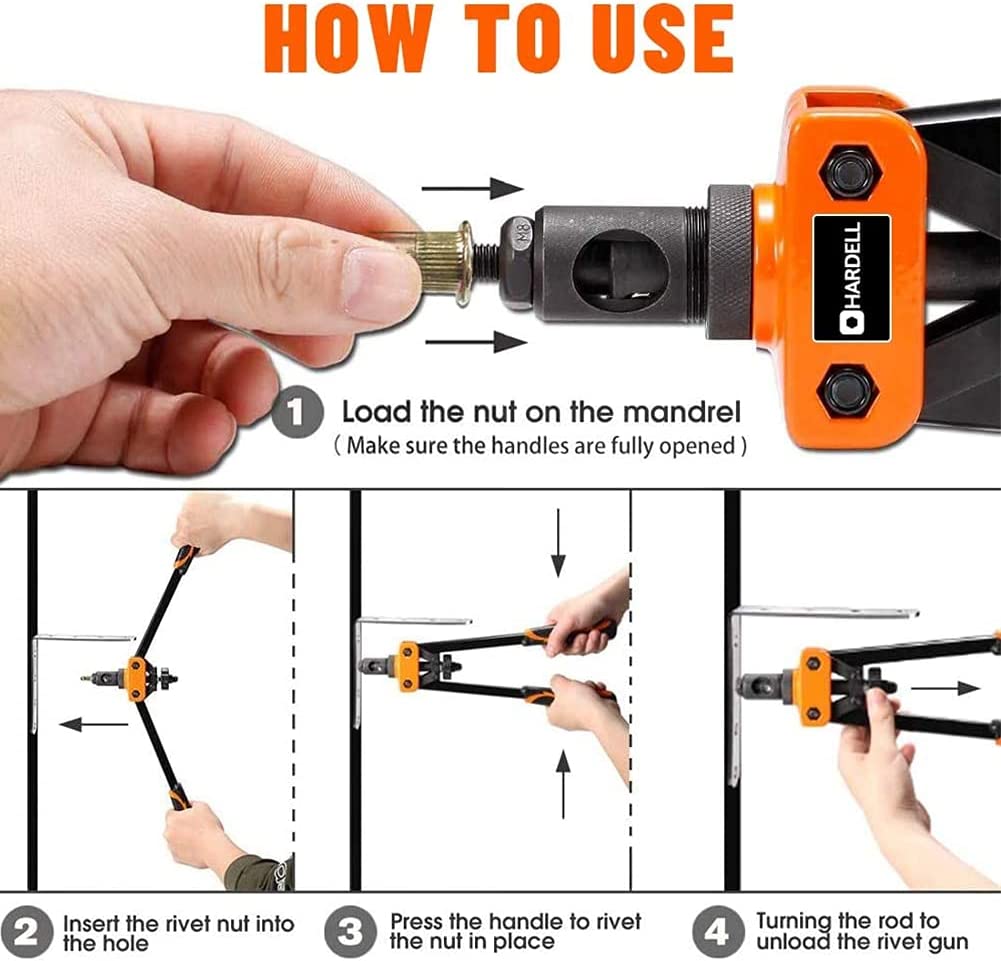
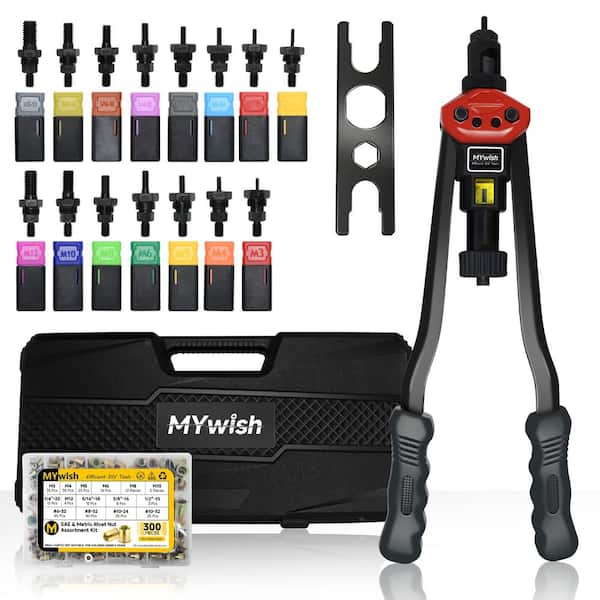
A hand rivet nut tool usually includes handles, a threaded mandrel, a nosepiece, and an adjustment system. The mandrel screws into the rivet nut. When you squeeze the handles, the tool pulls the mandrel and compresses the insert behind the panel.
How a Hand Rivet Nut Tool Works
A rivet nut has two important sections: the threaded barrel and the deformable body. The threaded barrel accepts the fastener, while the body expands or folds behind the material during installation.
The basic sequence is:
- Drill a correctly sized hole.
- Thread the rivet nut onto the tool’s mandrel.
- Insert the rivet nut into the hole.
- Squeeze the handles to deform the insert.
- Release the tool and remove it from the new threaded insert.
- Test the thread with the correct bolt.
The tool does not cut threads into the panel. Instead, it creates a mechanical anchor. That makes rivet nuts useful for thin panels where ordinary tapping would leave too little thread engagement.
In my workshop experience, most installation failures come from one of three issues: an oversized hole, too much compression, or a rivet nut that does not match the material thickness. The tool itself is rarely the real problem.

What You Need Before You Start
Gather the correct tools and parts before installing the first insert. A little preparation prevents most mistakes.
You will need:
- A hand rivet nut tool
- The correct mandrel and nosepiece
- Matching rivet nuts
- A drill
- The recommended drill bit
- A center punch
- A deburring tool or small file
- Safety glasses
- A wrench or hex key, if your tool requires one
- A bolt for testing the finished thread
Check the rivet nut package for the required hole size and grip range. The grip range tells you the thickness of material the insert can clamp. For example, an insert rated for 0.020 to 0.080 inch material may not hold correctly in a 0.125 inch panel.
Also check the fastener size. An M6 rivet nut requires an M6 mandrel and an M6 bolt. A 1/4-20 insert requires a 1/4-20 mandrel and matching bolt. Metric and inch threads are not interchangeable.
Always follow the instructions supplied with your tool. Different tools use different mandrel lengths, nosepiece settings, and stroke adjustments.

Choosing the Correct Rivet Nut
Correct insert selection is one of the most important parts of learning how to use a hand rivet nut tool. The wrong insert may spin, pull through the panel, crack the material, or provide weak threads.
Match the thread size
Choose the insert based on the fastener you plan to use. Common sizes include:
- M3, M4, M5, M6, and M8
- 8-32, 10-24, 10-32, and 1/4-20
- 5/16-18 and 3/8-16 for heavier work
Match the grip range
Measure the panel thickness with a caliper if possible. Then choose a rivet nut whose grip range includes that measurement.
A rivet nut that is too long may not collapse in the correct place. One that is too short may not grip enough material. Both can lead to a loose insert.
Select the right body style
Rivet nuts come in several shapes:
- Round body inserts are common and easy to install.
- Knurled inserts resist spinning in softer materials.
- Hexagonal inserts provide stronger resistance to rotation.
- Open-end inserts allow a bolt to pass through.
- Closed-end inserts seal the back of the hole and protect against moisture or debris.
- Flat-head inserts sit against the front surface.
- Countersunk inserts sit nearly flush with the panel.
For thin aluminum sheet, a knurled or hex-body insert may resist rotation better than a smooth round insert. For a sealed enclosure, a closed-end insert may be the better choice.

How to Use a Hand Rivet Nut Tool Step by Step
The following method works for most manual rivet nut setters. Read your tool manual first, especially if the tool uses a threaded adjustment rather than a fixed stroke.
1. Mark the hole location
Measure carefully and mark the center of the hole. Use a center punch to create a small starting point for the drill bit.
A punched mark helps prevent the bit from wandering. This matters when the hole must line up with a bracket or cover.
2. Drill the correct hole
Use the drill size listed by the rivet nut manufacturer. Do not guess based only on the bolt size. The required hole is usually slightly larger than the insert body but small enough to prevent movement.
Drill straight through the material. If the panel is thin, place a wood block behind it to reduce bending and tearing.
3. Deburr the hole
Remove sharp edges from both sides of the hole. A burr can prevent the rivet nut from sitting flat and may damage the insert during installation.
Do not enlarge the hole while deburring. Even a small increase in diameter can reduce the insert’s grip.
4. Install the correct mandrel
Fit the mandrel and nosepiece that match the rivet nut’s thread. Make sure the mandrel is clean and lightly lubricated if the tool manufacturer allows it.
The insert should screw onto the mandrel smoothly. If it feels tight or cross-threaded, stop and inspect the thread. Forcing it can damage both the mandrel and the rivet nut.
5. Thread the rivet nut onto the tool
Turn the rivet nut onto the mandrel until its head touches the nosepiece. Keep the insert straight. It should not wobble or sit at an angle.
Do not leave a large gap between the insert head and nosepiece. That gap can cause uneven deformation.
6. Insert the rivet nut into the panel
Push the rivet nut into the prepared hole until the head rests flat against the surface. The insert should enter with light hand pressure.
If it will not enter, check the hole size and remove any remaining burrs. Never hammer the insert into place unless the tool and insert instructions specifically allow it.
7. Squeeze the handles
Close the handles slowly and firmly. The tool pulls the mandrel, causing the back of the rivet nut to collapse against the rear of the panel.
For a small M3 or M4 insert, one controlled squeeze may be enough. Larger inserts may require more force or several handle movements, depending on the tool design.
Do not use excessive force. If the handles become unusually hard to close, the insert may be the wrong size, the mandrel may be misadjusted, or the hole may be too small.
8. Release the tool
Open the handles fully. Then turn the tool counterclockwise to unscrew the mandrel from the installed rivet nut.
Keep the tool aligned with the insert while removing it. Pulling sideways can loosen the new insert.
9. Inspect and test the installation
The rivet nut head should sit flat against the panel. The insert should not spin, rock, or pull out when you apply light hand pressure.
Thread in the correct bolt by hand. It should turn smoothly without binding. If the thread feels rough, remove the bolt and inspect the insert before applying torque.
How to Adjust a Hand Rivet Nut Tool
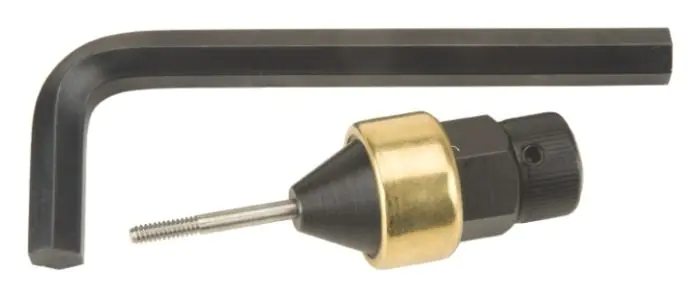
Many hand rivet nut tools use a stroke or compression adjustment. This setting controls how far the mandrel pulls the insert during installation.
Start with the manufacturer’s recommended setting. If no setting is provided, install a test insert in a scrap piece of the same material and thickness.
A good adjustment should:
- Fully collapse the insert behind the panel
- Keep the insert head flat
- Prevent the insert from spinning
- Avoid crushing or splitting the panel
- Allow the bolt to enter without damaged threads
If the insert spins after installation, it may need slightly more compression, a tighter hole, or a more suitable body style. If the panel dimples or the insert becomes distorted, reduce the setting.
A common beginner mistake is treating the tool like a pop rivet gun and squeezing as hard as possible. Rivet nut installation needs measured force, not brute force. The goal is firm expansion, not maximum deformation.
Testing the Installed Rivet Nut
A quick test can reveal problems before the part goes into service.
First, inspect the front of the insert. The head should remain flat and should not cut into the panel. Next, insert the matching bolt by hand. It should engage several turns without resistance.
Then perform a light pull and rotation check:
- Try to rotate the insert with the bolt installed.
- Apply gentle pulling force to the bolt.
- Check for movement, rocking, or panel damage.
- Remove the bolt and inspect the internal thread.
For critical assemblies, use the fastener torque specified by the equipment manufacturer or engineering drawing. Do not assume every rivet nut can handle the same torque. Load capacity depends on insert material, body style, panel material, grip length, thread size, and installation quality.
A test coupon is especially helpful for production work. Install several inserts in scrap material, then check their pull-out and spin resistance before working on the final panel.

Common Problems and How to Fix Them
The rivet nut spins
A spinning insert usually means the hole is too large, the insert is under-compressed, or the body style is not suitable for the material.
Remove the insert if possible and inspect the hole. Use the correct drill size and consider a knurled or hex-body rivet nut for soft material.
The rivet nut pulls through
This can happen when the panel is too thin, the insert has the wrong grip range, or the rear flange did not form correctly.
Choose an insert designed for the panel thickness. A larger head or backing washer may help in some applications, but only if the design permits it.
The mandrel will not unscrew
The tool may have been released before the insert was fully set, or the mandrel may be damaged. Try opening the handles fully and turning the tool gently counterclockwise.
Never force the mandrel with a large wrench. Excessive force can strip the insert thread or break the tool.
The bolt will not start
The insert may be cross-threaded, compressed unevenly, or filled with debris. Remove the bolt and inspect the thread with good lighting.
Do not use the bolt to force the insert into alignment. A damaged thread can make later repair much harder.
The panel bends
Thin material may need support behind the hole. Excessive tool pressure can also distort the panel.
Use the correct grip range and adjust the tool for controlled compression. For fragile panels, test the process on a spare piece first.

Safety Tips for Using a Hand Rivet Nut Tool
A hand rivet nut tool is simple, but it can still cause pinch injuries and flying debris.
Follow these basic precautions:
- Wear safety glasses while drilling and setting inserts.
- Keep fingers away from the handles and nosepiece.
- Clamp loose work securely.
- Remove metal chips before handling the panel.
- Do not use damaged mandrels or cracked handles.
- Keep the drill bit sharp and use the correct speed.
- Follow the material manufacturer’s guidance when drilling plastic or composite panels.
- Use proper ventilation if drilling painted, coated, or treated material.
- Check for wires, pipes, or components behind the panel before drilling.
When working on a vehicle, appliance, or machine, disconnect power and secure moving parts first. A rivet nut installation should improve the repair, not create a hidden electrical or mechanical hazard.
Benefits and Limitations of Rivet Nut Inserts
Rivet nuts offer several useful benefits:
- They create reusable threads in thin material.
- They can be installed from one side.
- They eliminate the need to hold a nut behind the panel.
- They work well for brackets, guards, access panels, and enclosures.
- They are useful when welding is not practical.
- They can reduce assembly time in repair and fabrication work.
They also have limits. A rivet nut is not automatically stronger than a welded nut or a solid threaded boss. Thin panels may still tear under high loads. Repeated over-tightening can strip the insert or loosen it in the panel.
For high-load, vibration-sensitive, or safety-critical applications, use engineering data and follow the equipment maker’s specifications. A professional designer may choose a welded nut, clinch nut, threaded standoff, or through-bolt instead.
Practical Tips From Workshop Use
One lesson I learned early is to test the setup before touching the finished part. A five-minute test on scrap can expose the wrong drill size, mandrel, or grip setting before it becomes an expensive repair.
I also avoid installing rivet nuts close to an unsupported edge. The material can flex or crack during compression. If the insert must sit near an edge, use a suitable large-head design and reinforce the area when possible.
Another useful habit is to keep separate trays for metric and inch inserts. They can look nearly identical, but mixing them can damage threads and waste time. I label the trays by thread size and material so the correct part is easy to reach.
For work exposed to moisture, use corrosion-resistant inserts and compatible fasteners. Dissimilar metals can create galvanic corrosion, especially in damp or salty environments. A suitable coating, sealant, or material combination may be needed.
Frequently Asked Questions About How to Use a Hand Rivet Nut Tool
Can I use a hand rivet nut tool on thick steel?
You can use one on thin or moderate sheet material if the tool and insert are rated for the required force. Thick steel may require a heavy-duty lever tool, pneumatic tool, or a different fastening method.
How tight should a rivet nut be installed?
Install it firmly enough to form a solid rear flange without crushing the panel or damaging the insert. Use the tool maker’s setting when available, and confirm the result with a test insert.
Why does my rivet nut keep spinning?
The hole may be oversized, the insert may be under-set, or the smooth body may not suit the material. Check the hole diameter, grip range, and insert style, then test a knurled or hex-body version if appropriate.
Can I remove and reinstall a rivet nut?
You can remove a rivet nut, but it may damage the hole or leave a loose opening. In many cases, replacement with a larger insert or a repair insert is safer than reusing the same part.
Do I need a special drill bit for a rivet nut?
You usually need a standard twist drill of the exact size listed for the insert. The important point is not a special bit but a clean, round hole with minimal burrs.
Can I install a rivet nut without drilling?
Most rivet nut installations require a properly sized hole. Some specialized self-piercing or self-drilling inserts exist, but they require compatible tools and should not be treated like standard rivet nuts.
What is the difference between a rivet nut and a pop rivet?
A rivet nut creates internal threads for a removable bolt. A pop rivet joins two materials permanently and does not provide a reusable threaded hole.
Conclusion
Learning how to use a hand rivet nut tool comes down to careful preparation and controlled pressure. Choose the correct insert, drill the specified hole, remove burrs, install the matching mandrel, and compress the rivet nut until it grips without crushing the panel.
Always test the setup on scrap when the material, insert, or tool is unfamiliar. With the right technique, a hand rivet nut tool can add strong, clean, reusable threads to panels that cannot be tapped or reached from behind. Try the process on a spare piece, inspect each installation, and explore your tool manufacturer’s guidance for more advanced applications.
