

You can make a Pittsburgh seam by hand with simple tools, careful bends, and patient folding.
If you’ve ever tried to join sheet metal cleanly, you already know the Pittsburgh seam is one of those joints that looks simple but rewards precision. I’ve used this seam on small duct parts, custom panels, and repair work, and I can tell you this: when you learn how to make a Pittsburgh seam with hand tools, you gain a joint that is tight, neat, and surprisingly strong without needing a machine. 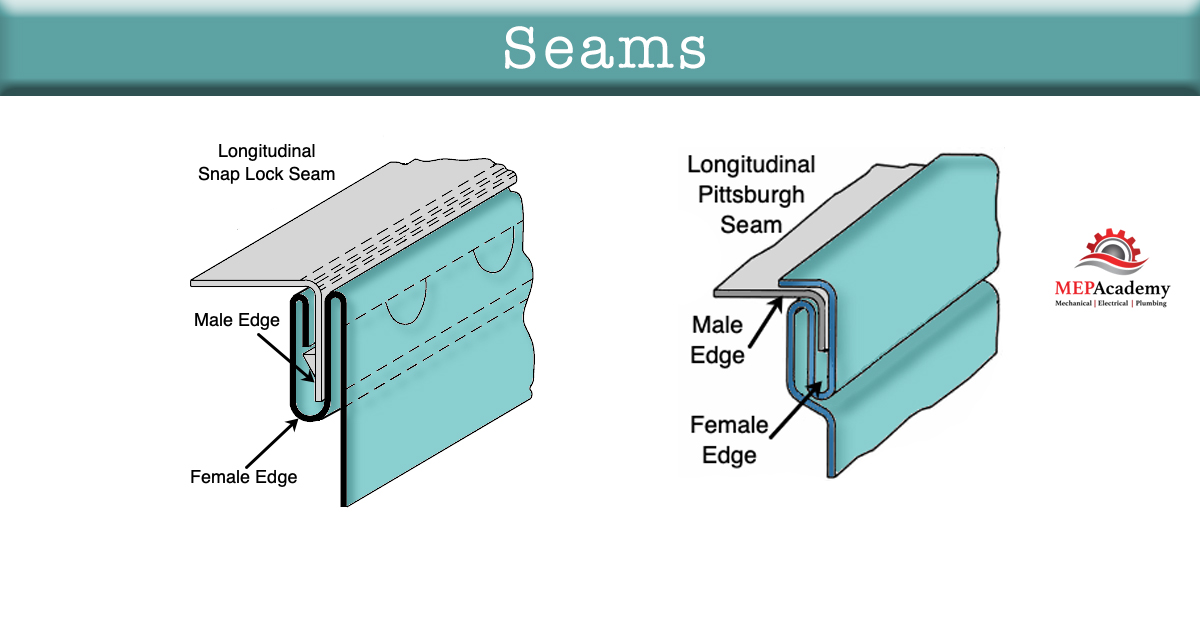
What a Pittsburgh seam is and why it matters
A Pittsburgh seam is a mechanical sheet metal joint used to connect two edges with one edge locked into the other. It is common in HVAC ductwork, sheet metal boxes, and light fabrication because it creates a secure seam that can be assembled by hand or with simple shop tools.
At a practical level, the joint works like a folded hook and channel. One edge gets formed into a flange, and the other gets shaped to accept it. When the pieces slide together and lock, you get a clean seam that holds well and can be sealed if needed.
The reason this joint is so useful is that it balances strength, speed, and simplicity. You do not need welding for many jobs. You just need straight cuts, good bends, and consistent folds.
Tools and materials you need
Before you make a Pittsburgh seam with hand tools, gather the basics. The right setup makes the job much easier and helps prevent warped edges or weak locks.
Here is a simple hand tool list:
• Sheet metal snips or aviation snips for cutting the metal
• A steel ruler or tape measure for layout
• A scriber, marker, or fine tip pencil for marking
• A hand seamer for bending flanges
• A metal brake, small bench vise, or sturdy straight edge for folding
• A mallet or dead blow hammer for light forming
• Clamp or locking pliers for holding the work
• Deburring tool or file for smoothing sharp edges
• Safety gloves and eye protection
For material, galvanized steel is the most common choice in HVAC work. Aluminum and light-gauge stainless can also be used, but they need a bit more care because they bend differently and can mark more easily.
I’ve found that many beginner mistakes start with bad prep, not bad technique. If the cut is rough or the edge is bent in the wrong direction, the seam will fight you every step of the way.
How to make a Pittsburgh seam with hand tools step by step
Learning how to make a Pittsburgh seam with hand tools is mostly about order. If you rush the bends, the seam will not lock cleanly. If you keep the edges straight and square, the joint goes together much more smoothly.
Step 1: Measure and mark the joint
Start by measuring the sheet metal edges that will meet. Mark the flange width and the depth of the lock area so both pieces match.
A typical Pittsburgh seam needs one edge formed into a pocket or receiver and the other into a matching flange. Exact sizes can vary based on material thickness and the job, but the important thing is consistency. Uneven marks lead to uneven folds.
Step 2: Cut the sheet metal cleanly
Use snips to cut along your marked lines. Try to keep the cut smooth and avoid extra notches at the corners unless your layout calls for them.
Sharp corners and jagged cuts make fitting harder. They can also create stress points that affect the seam later. After cutting, check the edge for burrs and remove them with a file or deburring tool.
Step 3: Form the pocket edge
One side of the joint needs a channel or pocket shape. This is the side that will receive the other edge.
Use a hand seamer or clamp the metal along a straight edge, then bend the lip gradually. Keep the fold even from end to end. I like to make the bend in small passes rather than trying to force it all at once, because that gives you more control and less distortion.
Step 4: Form the insert edge
The other edge needs a matching flange that fits into the pocket. Bend this edge to the correct angle and depth so it slides into the receiver without forcing it.
The fit should be snug, but not so tight that you have to beat it together. If it is too tight, the seam can buckle. If it is too loose, the seam will feel weak and may open up under stress.
Step 5: Test the fit before locking
Dry fit the two pieces before fully closing the seam. This is one of the most important parts of how to make a Pittsburgh seam with hand tools.
Check these points:
• The edges line up evenly
• The fold depth is consistent
• The corners sit flat
• The pieces slide together without twisting
• There is no obvious gap along the seam
If something is off, fix it now. Once the seam is locked, small mistakes become much harder to correct.
Step 6: Lock the seam by hand
Now insert the flange into the pocket and begin closing the seam. Use hand pressure first, then a mallet or seamers to finish the fold.
Work from one end to the other in short sections. This helps keep the seam straight and prevents a bulge in the middle. If needed, place the seam on a flat surface and press it down evenly with a block of wood or a flat metal edge.
Step 7: Tighten and flatten the seam
Once the seam is engaged, go back over it and tighten it. This gives the joint a cleaner look and a firmer hold.
Use a hand seamer or mallet to flatten the fold carefully. Do not overwork the same spot too much, especially on thinner sheet metal. Too much force can leave ripples or flatten the profile unevenly.
Step 8: Check the finished joint
Inspect the seam for gaps, loose spots, or uneven edges. A good Pittsburgh seam should look straight and feel solid.
If the joint will be used in ductwork, check whether it needs sealant or mastic. A mechanically locked seam can still leak air if the system requires a tighter seal. In my experience, the seam is only as good as the final inspection.

Best hand tool techniques for cleaner seams
A clean seam is mostly a matter of control. The best results usually come from patient, repeated bends instead of one hard bend.
These habits help a lot:
• Bend a little at a time instead of forcing the metal
• Keep your layout lines clear and easy to read
• Use the full length of the seam so pressure stays even
• Support the sheet metal on a flat surface when folding
• Stop and test-fit often
• Smooth every cut edge before assembly
One lesson I learned early was not to trust my eyes alone. Sheet metal can look square even when one side is just slightly off. A small error at the start can turn into a seam that refuses to close cleanly by the end.
Common mistakes to avoid
Even experienced workers run into trouble with Pittsburgh seams when they get rushed. The seam is forgiving in some ways, but it still demands good habits.
Watch out for these common issues:
• Cutting too much off the flange and losing the proper lock
• Making the pocket too tight, which causes buckling
• Leaving burrs that stop the seam from seating fully
• Bending the metal unevenly from one end to the other
• Hammering too hard and denting the panel
• Skipping the dry fit before locking the seam
If the seam looks messy, do not blame the joint right away. Often the real problem is that one of the prep steps was off. Good metalwork is a chain, and the seam is only as strong as the weakest link.
When to use a Pittsburgh seam
A Pittsburgh seam is a smart choice when you need a strong mechanical joint without welding. It is especially common in light-gauge sheet metal work.
Good uses include:
• HVAC duct sections
• Metal enclosures
• Panels for cabinets or boxes
• Light repair work
• Custom fabrication on thin material
It is less useful when the metal is very thick or when the part needs a fully sealed structural weld. In those cases, another joint method may be better.
Why hand tools still work well
You do not need a machine to make a good seam. Hand tools give you control, especially on short runs, repairs, and custom one-off pieces.
That said, hand tool work has limits. It is slower than machine forming, and consistency depends more on skill. Still, for many small shop jobs, it is the best mix of cost, flexibility, and accuracy.
I often recommend hand tools to beginners because they teach the feel of the metal. Once you understand how the sheet reacts, you will make fewer mistakes even if you later move to powered equipment.
Safety tips for working sheet metal
Sheet metal edges are sharp, and that is not an exaggeration. Even a small slip can leave a deep cut.
Keep safety in mind:
• Wear cut-resistant gloves when handling raw sheet metal
• Use eye protection when cutting or hammering
• Deburr edges before repeated handling
• Keep fingers clear of pinch points when folding
• Work on a stable bench or table
A safe workspace also helps the seam come out better. When your tools and hands are under control, your bends are more accurate.
Frequently Asked Questions of how to make a pittsburgh seam with hand tools
What gauge metal works best for a Pittsburgh seam by hand?
Light-gauge sheet metal is the easiest to work with by hand, especially for beginners. Thicker material can still be formed, but it takes more force and better tools.
Do I need a special machine to make a Pittsburgh seam?
No, you can make a Pittsburgh seam with hand tools if the material is light enough and the joint is small to medium in size. A hand seamer, snips, and a firm work surface are often enough for basic jobs.
Why does my seam not close evenly?
Uneven closing usually comes from inconsistent bends, bad measurements, or burrs on the edge. Check your flange depth and make sure both sides were formed the same way before locking the joint.
Can I make a Pittsburgh seam on aluminum?
Yes, aluminum works well for hand-formed seams, but it scratches and bends more easily than galvanized steel. Use lighter pressure and go slowly so you do not distort the metal.
Is a Pittsburgh seam strong enough for ductwork?
Yes, it is widely used in ductwork because it creates a solid mechanical joint. For air systems, the seam may also need sealing depending on the job requirements.
What is the biggest mistake beginners make?
The biggest mistake is rushing the bend and skipping the test fit. If the pieces are not shaped correctly before locking, the seam will fight you and may never sit flat.
Conclusion
Learning how to make a Pittsburgh seam with hand tools comes down to careful layout, clean cuts, steady bends, and a patient final lock. Once you understand the shape of the joint, it becomes much easier to repeat with confidence on ducts, panels, and other light sheet metal projects.
The real payoff is not just a neat seam. It is the skill you build every time you make one by hand. Start with small pieces, move slowly, and focus on consistency, and you will get cleaner results faster than you expect.
If this guide helped you, try the steps on a practice piece and see how the metal responds. Then keep building from there, and feel free to explore more fabrication tips or leave a comment with your own seam-making experience.
